This blog is dedicated to electric powered remote control airplane and park flyer enthusiasts. It serves as a resource for newbies, novices, and intermediate pilots.
I made over my Hobby-Lobby Graupner Mini Piper to look like the Grasshopper L-7 Army plane. My Piper is not 100% fully authentic in appearance, but I am happy with the outcome nonetheless.
I am not happy with how these pictures came out beneath the flourescent lights in my kitchen. I will take more photos outside on a sunny day, which will show you how nice the plane really looks.
The flourescent lights called attention to all the blemishes of the plane, whereas when you look at it with the naked eye you don't see them.
The video camera did not do any justice to how nice the plane came out either.
With our new video camera Pilot Tom shot the film. It is really challenging to record a plane. I did not do any stunts in this video and tried to keep a slow speed for Tom.
I really recommend that the pilot and camera person discuss a flight pattern before take-off and the pilot will need to cue the camera person in on when he/she will speed up so the camera can zoom out first. The pilot needs to fly lower to the ground and closer to the camera than I did.
If the camera can be manually focused I recommend that. If not, for the sake of the auto focus the pilot should maintain the same amount of distance from the camera and the same speed in order to produce a crisp video.
Since I began flying again four years I have destroyed at least two to three planes. I have had some seriously spectacular wrecks, where upon impact into the ground my planes have shattered into pieces leaving nothing but a stryafoam snow storm to fall down and bury my wreckage. Pilot Tom is still learning the nuances of flying. His plane had previously suffered a broken wing and required a new servo. His repairs were perfect and he was airborne once again. During Tom's past flight he attempted a loop from level flight, but lacked power. I told him to pick up speed and dive about 10-15 feet and then pull into a loop. He streamed across the sky and dove. The moment he pulled up elevator the entire park heard a BOOM! as the G-Force of the plane split his wing halves and the left side of the wing fluttered down slowly and safely . . . as pictured below. Wile this was happening Tom killed all throttle and tried to straighten out his plane with mild input to keep it from the death spiral it was in. He was able to gain some control as it fell 40 to 5o feet to the ground. We were 30 to 40 yards from the plane and there was nothing anyone could do. It was a spectacular sight watching this plane spin out of control towards the earth -- like a WWII dog fight that ended bad. I was skeptical that the fuselage would be able to be repaired. Tom surveyed the damage and over the next week was able to massage the plastic fuse back into shape, build a wood servo bay to replace the broken plastic one, repair the ripped plastic where the tail slips into, and replace the other servo. Finally, he used 5-minute epoxy to glue the seam where the wing halves meet to avoid the wings pulling apart under pressure again. His plane flew again as seen below . . .
Using a $1.99 rubber-band powered P-51 Mustang I bought from Harbor Freight Tools along with the guts from an Air Hogs Aero Ace I created a 2-channel micro flyer. Above you can see the charging mechanism cut and installed into the fuselage. Below you will see the same with the li-po battery. I used hot glue to secure them.
Using a Xacto blade I cut slits in the styrafoam to lock/protect the wires and to avoid them dangling, which could catch something on landing.
I started this project with a Combo package (see below) I bought on clearance from Target for $17.00. I intended to create a flying wing micro flyer, which I expect would be a rather quick plane. I scrapped this idea because I do not know enough about CG (center of gravity) for flying wings; therefore I will research this further and use another Aero Ace to build this plane.
First, remove the top wing on the Aero Ace and then using your thumb and index finger slowly thumb it apart from the nose back. It is glued together with rubber cement. That goo will be left on the parts and engines -- just re-stick it. It will stay. Or you can use a small amount of hot glue.
Be very careful when removing the guts, especially the antennae (which goes through the rudder)! Take your time and pull gently!!
The video at the top of this posts explains "how to" as well.
This post is dedicated to amateur competitive eating man Megamunch (Dave), who is also a pilot. His philosophy in flying is "crashing is as fun as flying." With that approach to the hobby one can not justify spending several hundred on a plane, BUT that does present the pilot with a challenge: can you make crap fly?
Dave bought a lemon of a plane for $80 from Harbor Freight Tools -- an SDM Piper. Since then he has invested at least another $80 and built up his plane with a geared 370 motor and larger prop. He upgraded the battery to 9.6v and added some large bush plane style wheels.
Keep posted for a windless morning when Dave and I are both free and I will video tape this bird's maiden voyage. I suspect she'll fly.
Tom bought his 3-channel Wing Dragon on sale from Hobby-Lobby for $79 total. The plane comes as an RTF with flight sim software and USB connector for your transmitter to your PC. It is by far the best 3-channel plane that I have seen for under $100 and will compete with the $150 RTFs out there. This plane has good power and an awesome glide range. From 75 feet high I glided over 60 yards after the battery died and landed on my mark in the baseball diamond. It is a great plane for a beginner pilot and offers the most bang for the buck. It will perform loops and other basic aerobatics. Here Tom taxis around the landing strip at our local ball field. I did not charge the battery the night before so he lacked a full charge and did not have enough power to fly.
Tom has his best flight ever flying his Hobbyzone plane. He is learning that the LEAST amount of input (moving the sticks on the transmitter) results in the BEST flights without as many errors or crashes. The best advice I was given when learning to fly was "let the plane fly itself. Only change direction when you really need to." Thanks Yhunuan, you were absolutely correct.
Your goal as a pilot is to keep the plane flying level and straight. If the plane is going down/left give the opposite of up/right until the plane is level and straight again.
Remember, giving input into the transmitter is like cutting hair. It's better to cut only a little and if you need your hair shorter to cut just a little more. If you cut a lot you can never correct it, just wait for the hair to grow back. The same with an airplane, if you give too much stick it is highly possible that you will not be able to correct and you will crash.
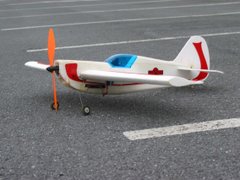
SDM Yellow Bee with 1.5" Du-Bro mag wheels. These wheels make take-offs and landings so much easier. This plane can take off of wood chips or mulch with these wheels. The wheels weigh little and make the plane so much more versatile. Touch downs and landings are a bit easier with large wheels, because small pebbles and sticks and such don't cause the plane to nose over.
For a close up of the wheels see my Feb. 15, 2007 post on "How to repair your plane."
! I am an idiot because I cut the camera off one second before the Yellow Bee completed the loop. I thought Pilot Tom needed my guidance and he flew my plane into a series of vertical stalls . . . a 2-channel plane nonetheless. Amazingly HE COMPLETED A LOOP and landed it -- a bit rough though no damage at all. For those of you that know . . . with an elevator loops are near impossible. The SDM Yellow Bee has a fair amount of power for a $29 junker.
If you are high enough in the air to stall your 2-channel plane several times using full throttle it may, just may, be possible for you to complete an ugly loop. It helps if you have a bit of breeze and are heading into the wind. The is a BIG danger with stalling a 2-channel plane, because you will loose a lot of altitude and not be able to correct it with up elevator; therefore you should be three mistakes high (75 feet).
If you want to avoid stalls, which I instructed my neighbor, Tom, on . . . you must NOT give full throttle to escape the stalls. Instead, give about 70% of power and the plane will level itself out and fly nicely.
Stalls happen when you plane is climbing at too steep of an angle for the wings to receive lift while moving through the air. Contradictory to commonsense (give more speed and up elevator to correct) you need to give down elevator and/or let off the throttle a little to AVOID stalling, which should be your goal or you will likely crash.

 I am not happy with how these pictures came out beneath the flourescent lights in my kitchen. I will take more photos outside on a sunny day, which will show you how nice the plane really looks.
 The flourescent lights called attention to all the blemishes of the plane, whereas when you look at it with the naked eye you don't see them.