Here's an old challenge of building free flight planes that my friend, Pilot Dave, and I use to do. You can find photos and descriptions of our competitions at:
www.rcplanepilot.blogspot.com
I challenge all readers and lurkers of this blog to build a set of functional floats for one of these free flight electric planes and video tape it landing in a pool of water. Or build a plane that will fly for 2 minutes or more and video tape.
Please send me photos and link of the video and I will gladly post it.
Next time the wind is a 0 MPH I will record a video of these birds (in the video) flying and post them.
Saturday, November 03, 2007
Friday, November 02, 2007
Repairs after a nose dive
It's been two years since I have had a wreck (not counting screwing around with the Yellow Bee) and sadly . . . as all experienced pilots say:
"Everyone crashes. If you don't then you're not flying."
I have gotten too comfortable . . . I was in the process of landing after a ten minute flight using throttle maintenance, so I should have had plenty of power for landing. I was flying to an adjacent baseball diamond, a last minute decision, because of the wind direction and I had to cross the sun. I juiced the throttle to fly above the sun from my point-of-view to avoid being blinded . . . suddenly my plane dove -- I was 12 to 18 feet from the ground. I panicked. I over sticked and my plane spiraled. I could not tell if I was upside up or upside down.
To this day I wonder if my batt was to low and ESC cut power momentarily. That's the only way I can explain the dive.
The obvious solution would have been to land in the grass next to me so I could see my plane and guide it to the ground safely.
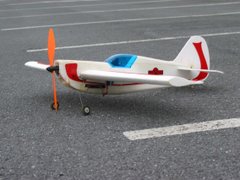
 Above is what my plane looked like after the hard nose dive and somersaulted across the grass field at a local park. As you can see this is a critical spot that endures a lot of stress, because it houses my motor mount. The prop didn't fair to well either.
 Typically the longer it takes for an epoxy to cure the heavier the epoxy weighs. It is best to use as little epoxy as possible, but in case like this I was generous. You should wipe off all excess glue immediately. Ninety-five percent of the time CA glue or 5-minute Epoxy is the best choice for park flyers, but this time I used 24-hour epoxy because I need this bond to be very strong. This slower epoxy also allows me to set everything perfectly and check and then recheck.
 The best way to tighten up the sides in a glue job like this is criss-cross your needles at opposing angles. This will not only pull the sides closer together, but also hold them better. I should have done that more on this job, but if you look at the top end you will see that I did.
I aim to fly again as soon as the weather permits.
"Everyone crashes. If you don't then you're not flying."
I have gotten too comfortable . . . I was in the process of landing after a ten minute flight using throttle maintenance, so I should have had plenty of power for landing. I was flying to an adjacent baseball diamond, a last minute decision, because of the wind direction and I had to cross the sun. I juiced the throttle to fly above the sun from my point-of-view to avoid being blinded . . . suddenly my plane dove -- I was 12 to 18 feet from the ground. I panicked. I over sticked and my plane spiraled. I could not tell if I was upside up or upside down.
To this day I wonder if my batt was to low and ESC cut power momentarily. That's the only way I can explain the dive.
The obvious solution would have been to land in the grass next to me so I could see my plane and guide it to the ground safely.
 Above is what my plane looked like after the hard nose dive and somersaulted across the grass field at a local park. As you can see this is a critical spot that endures a lot of stress, because it houses my motor mount. The prop didn't fair to well either.
 Typically the longer it takes for an epoxy to cure the heavier the epoxy weighs. It is best to use as little epoxy as possible, but in case like this I was generous. You should wipe off all excess glue immediately. Ninety-five percent of the time CA glue or 5-minute Epoxy is the best choice for park flyers, but this time I used 24-hour epoxy because I need this bond to be very strong. This slower epoxy also allows me to set everything perfectly and check and then recheck.
 The best way to tighten up the sides in a glue job like this is criss-cross your needles at opposing angles. This will not only pull the sides closer together, but also hold them better. I should have done that more on this job, but if you look at the top end you will see that I did.
I aim to fly again as soon as the weather permits.
Sunday, October 28, 2007
Graupner Mini Piper Make-Over

I made over my Hobby-Lobby Graupner Mini Piper to look like the Grasshopper L-7 Army plane. My Piper is not 100% fully authentic in appearance, but I am happy with the outcome nonetheless.
 I am not happy with how these pictures came out beneath the flourescent lights in my kitchen. I will take more photos outside on a sunny day, which will show you how nice the plane really looks.
 The flourescent lights called attention to all the blemishes of the plane, whereas when you look at it with the naked eye you don't see them.
The video camera did not do any justice to how nice the plane came out either.
Bummed with the photos and videos!
Video cameraing a plane is not easy
With our new video camera Pilot Tom shot the film. It is really challenging to record a plane. I did not do any stunts in this video and tried to keep a slow speed for Tom.
I really recommend that the pilot and camera person discuss a flight pattern before take-off and the pilot will need to cue the camera person in on when he/she will speed up so the camera can zoom out first. The pilot needs to fly lower to the ground and closer to the camera than I did.
If the camera can be manually focused I recommend that. If not, for the sake of the auto focus the pilot should maintain the same amount of distance from the camera and the same speed in order to produce a crisp video.
The most amazing wreck ever
 Since I began flying again four years I have destroyed at least two to three planes. I have had some seriously spectacular wrecks, where upon impact into the ground my planes have shattered into pieces leaving nothing but a stryafoam snow storm to fall down and bury my wreckage.
 Pilot Tom is still learning the nuances of flying. His plane had previously suffered a broken wing and required a new servo. His repairs were perfect and he was airborne once again.
 During Tom's past flight he attempted a loop from level flight, but lacked power. I told him to pick up speed and dive about 10-15 feet and then pull into a loop. He streamed across the sky and dove. The moment he pulled up elevator the entire park heard a BOOM! as the G-Force of the plane split his wing halves and the left side of the wing fluttered down slowly and safely . . . as pictured below.
Wile this was happening Tom killed all throttle and tried to straighten out his plane with mild input to keep it from the death spiral it was in. He was able to gain some control as it fell 40 to 5o feet to the ground. We were 30 to 40 yards from the plane and there was nothing anyone could do. It was a spectacular sight watching this plane spin out of control towards the earth -- like a WWII dog fight that ended bad.
 I was skeptical that the fuselage would be able to be repaired. Tom surveyed the damage and over the next week was able to massage the plastic fuse back into shape, build a wood servo bay to replace the broken plastic one, repair the ripped plastic where the tail slips into, and replace the other servo. Finally, he used 5-minute epoxy to glue the seam where the wing halves meet to avoid the wings pulling apart under pressure again. His plane flew again as seen below . . .
Beautiful take-off Tom!
Wednesday, July 11, 2007
Saturday, June 30, 2007
Homemade Micro RC Airplane
Using a $1.99 rubber-band powered P-51 Mustang I bought from Harbor Freight Tools along with the guts from an Air Hogs Aero Ace I created a 2-channel micro flyer.
 Above you can see the charging mechanism cut and installed into the fuselage. Below you will see the same with the li-po battery. I used hot glue to secure them.
 Using a Xacto blade I cut slits in the styrafoam to lock/protect the wires and to avoid them dangling, which could catch something on landing.
 I started this project with a Combo package (see below) I bought on clearance from Target for $17.00. I intended to create a flying wing micro flyer, which I expect would be a rather quick plane.
 I scrapped this idea because I do not know enough about CG (center of gravity) for flying wings; therefore I will research this further and use another Aero Ace to build this plane.
 First, remove the top wing on the Aero Ace and then using your thumb and index finger slowly thumb it apart from the nose back. It is glued together with rubber cement. That goo will be left on the parts and engines -- just re-stick it. It will stay. Or you can use a small amount of hot glue.
 Be very careful when removing the guts, especially the antennae (which goes through the rudder)! Take your time and pull gently!!
 The video at the top of this posts explains "how to" as well.
Wednesday, June 20, 2007
Can crap fly?
 This post is dedicated to amateur competitive eating man Megamunch (Dave), who is also a pilot. His philosophy in flying is "crashing is as fun as flying." With that approach to the hobby one can not justify spending several hundred on a plane, BUT that does present the pilot with a challenge: can you make crap fly?
Dave bought a lemon of a plane for $80 from Harbor Freight Tools -- an SDM Piper. Since then he has invested at least another $80 and built up his plane with a geared 370 motor and larger prop. He upgraded the battery to 9.6v and added some large bush plane style wheels.
Keep posted for a windless morning when Dave and I are both free and I will video tape this bird's maiden voyage. I suspect she'll fly.
Hobby-Lobby's Wing Dragon

Tom bought his 3-channel Wing Dragon on sale from Hobby-Lobby for $79 total. The plane comes as an RTF with flight sim software and USB connector for your transmitter to your PC. It is by far the best 3-channel plane that I have seen for under $100 and will compete with the $150 RTFs out there. This plane has good power and an awesome glide range. From 75 feet high I glided over 60 yards after the battery died and landed on my mark in the baseball diamond. It is a great plane for a beginner pilot and offers the most bang for the buck. It will perform loops and other basic aerobatics.
Here Tom taxis around the landing strip at our local ball field. I did not charge the battery the night before so he lacked a full charge and did not have enough power to fly.
The secret to a good flight
Tom has his best flight ever flying his Hobbyzone plane. He is learning that the LEAST amount of input (moving the sticks on the transmitter) results in the BEST flights without as many errors or crashes. The best advice I was given when learning to fly was "let the plane fly itself. Only change direction when you really need to." Thanks Yhunuan, you were absolutely correct.
Your goal as a pilot is to keep the plane flying level and straight. If the plane is going down/left give the opposite of up/right until the plane is level and straight again.
Remember, giving input into the transmitter is like cutting hair. It's better to cut only a little and if you need your hair shorter to cut just a little more. If you cut a lot you can never correct it, just wait for the hair to grow back. The same with an airplane, if you give too much stick it is highly possible that you will not be able to correct and you will crash.
Big wheels help make bush planes?
SDM Yellow Bee with 1.5" Du-Bro mag wheels. These wheels make take-offs and landings so much easier. This plane can take off of wood chips or mulch with these wheels. The wheels weigh little and make the plane so much more versatile. Touch downs and landings are a bit easier with large wheels, because small pebbles and sticks and such don't cause the plane to nose over.
For a close up of the wheels see my Feb. 15, 2007 post on "How to repair your plane."
For a close up of the wheels see my Feb. 15, 2007 post on "How to repair your plane."
A loop with a 2-channel plane
! I am an idiot because I cut the camera off one second before the Yellow Bee completed the loop. I thought Pilot Tom needed my guidance and he flew my plane into a series of vertical stalls . . . a 2-channel plane nonetheless. Amazingly HE COMPLETED A LOOP and landed it -- a bit rough though no damage at all. For those of you that know . . . with an elevator loops are near impossible. The SDM Yellow Bee has a fair amount of power for a $29 junker.
If you are high enough in the air to stall your 2-channel plane several times using full throttle it may, just may, be possible for you to complete an ugly loop. It helps if you have a bit of breeze and are heading into the wind. The is a BIG danger with stalling a 2-channel plane, because you will loose a lot of altitude and not be able to correct it with up elevator; therefore you should be three mistakes high (75 feet).
If you want to avoid stalls, which I instructed my neighbor, Tom, on . . . you must NOT give full throttle to escape the stalls. Instead, give about 70% of power and the plane will level itself out and fly nicely.
Stalls happen when you plane is climbing at too steep of an angle for the wings to receive lift while moving through the air. Contradictory to commonsense (give more speed and up elevator to correct) you need to give down elevator and/or let off the throttle a little to AVOID stalling, which should be your goal or you will likely crash.
Tuesday, June 19, 2007
Extra: Difficult to video camera
With a new Sony Handycam, my neighbor, Tom attempted to record me flying my Copperhead Aviation "Extra Stiffy." To my demise, he could not keep up with the plane. I did rolls, stall turns, etc. and the plane just moved a bit too quick. Plus it was very very bright out and hard for him to see the LCD. But at least you can see the plane take off vertical.
Friday, May 18, 2007
SDM Piper Cub Motor Upgrade
My buddy, Dave, wanted an inexpensive 3-channel plane so he bought the SDM Piper Cub from Harbor Freight Tools for $79. The plane did not fly stock so he decided to upgrade the motor and prop size per suggestions from "Shun Da Piper Cub" forum from rcuniverse.com. The guys on the forum are very nice and helpful -- plus they are quite innovative.
UPGRADE COSTS:
$30 -- 9.6 v 1000 mah batt (Parkzone)
$30 -- charger
$2 -- firewall for motor (from the Parkzone Piper Cub set up)
$25 -- motor/gear drive/prop (from the Parkzone Piper Cub set up)

The photo above shows the Cub assembled with the geared motor with the motor cowl off.

The angle of the prop shaft may scare you because it is so off center. Don't worry about it -- you're good.

Using a Dremel we grinded/sanded down the stock firewall until it was perfectly flat. We then used 5-minute Epoxy to glue on the Parkzone Piper Cub firewall. Then we held the gear assembly up to the firewall and marked where the four screws will enter and drilled accordingly. We also drilled a large hole to pass the wires through into the fuselage. We wired the motor to the ESC (electronic speed control) and screwed the gear box & motor to the firewall.

Here you see the angle of the prop shaft with the cowl on.

Here, again, you see the angle of the prop shaft with the cowl on.

In order to adjust the CG (center of gravity) we placed the receiver near the servos and using double stick tape we taped the back of the ESC to the back of the receiver.
I recommend buying some one or two inch shrink tubing (it's clear and shrinks by 50%) from your local rc aircraft store and remove the casing around the ESC and receiver and sealing it in shrink wrap. They will cut a lot of weight and help the plane's performance.

In order to power the geared the motor Dave bought an eight cell 9.6 volt 1000 mah nimh battery. We soldered on the correct connections so the esc and batt could talk. This battery is heavier because it has one more cell than the stock battery, which should help with windier flights. The down side is we had to carve away the batt compartment and fill the nose with foam and slide the battery inside of it. We marked the battery with a sharpie to remind us where the CG would be with the battery. We then packed foam behind the battery in the batt compartment so the battery could not move at all.
For the record, with all that Dave has spent and time we have both invested in this plane I believe spending $159 on a Hobbyzone "Super Cub" is a much better choice. The plane is complete and very well built and perfect for a beginner. Spending less than $160 on a 3-channel plane is not a good idea unless you enjoy working on your plane, which I do, but the owner Dave does not.

Sunday, May 06, 2007
Decorating your styro plane

Here's a sneak peek of my Graupner Mini Piper, that I am converting to a Piper Grasshopper.Using olive drab (color) styro safe spray paint that I got from my local hobby store (lhs) I painted my plane with the LIGHTEST coat that I could that fully covered the plane. I taped off the areas that I wanted to paint my stripes and then sprayed it. I also taped off the tires and spray painted the rims. With a brush, tape, and black and white styro safe paint I paint, I painted my army stripes. Next, I will add Army decals after I use some alcohol to clean the surface. I still need to touch it it with olive drab and a brush, especially around the nose. I made a mistake by rubber banding the nose pieces together and the glue stuck to the rubber bands. It's better to use pins only. This plane will look great when it is complete and I am so close. I bought my Graupner Mini Piper from Hobby-Lobby and it is a good first or second plane.
Flight Report: Copperhead Aviation Extra Stiffy
 A great 3rd park flyer is the "Extra Stiffy" made by Copperhead Aviation. Beside my plane you will see my original radio, HiTec Flash 5 and my new lipo charger/balancer -- FMA Cellpro4. If you think that this hobby will be a long-term investment for you I recommend thinking ahead. I am very happy that I bought a radio that I could grow into, because I did not need to upgrade my radio.
This plane's performance is outstanding. It will fly vert. Imagine driving a sports car and then driving a standard car. The sports car accelerates better and corners very well, because of stiffer suspension. The same can be said about the Extra Stiffy, because the plane overflows with power and is very stiff; therefore it is very responsive in the air.
Take-off took less than 8 feet and before I knew it (in seconds) the plane was 65 feet in the air. I flew at about 1/3 throttle. The plane tracked very well. Rolls resulted in no loss of altitude. Loops and inverted loops were easy pulled off. The plane required a little speed to be landed and could be flown to the ground with throttle and no elevator.
The plane is expensive for a foamy at $89, but the reviews I have read seem to justify the costs.
www.copperheadaviation.com
Thursday, February 15, 2007
How to repair your plane
This is my experimental Geni-pig airplane. It is a SDM Yellow Bee and can be purchased for $29 RTF at Harbor Freight Tools. They also sell replacement wings/tails. I added the Dubro 1.5" micro wheels and love them. I can take off of mulch and land in the grass. All I had to do is drill 1/16" hole in them and that was it. I have crashed this plane into the ground, fences, trees, buildings -- you name it. It's a tough plane for the buck.
 My friend, Dave, can be a maverick pilot at times. And this time he took a nose dive from 25-30 feet up. He's a good guy. He's buying me a replacement Yellow Bee. In meantime, since he is the new owner, I thought I'd repair it and give it to him in a usable-state. But beware, the plane is much less forgiving even to gentle crashes now.
 The first thing you do is "dry fit" all of the parts and think about how to best repair the plane. I used 5-Minute Epoxy, duct tape, and packaging tape. The dry fit went well, but I had a little trouble getting everything to align up perfectly once I began gluing.
 When ever you are gluing your broken plane back together, regardless if it is plastic or Styrofoam, ONLY GLUE ONE EDGE AT A TIME. This will help you align it perfectly. If you try to to glue it all at once and one little part is not aligned the structural integrity of your repair job will be compromised. I always go in steps, often gluing in five or more stages -- even for small pieces. I do a little here and a little there. Low key and no stress. In the picture above I used duct tape (had to shorten it) to tape the inside of the canopy to hold the seal tight.
 After I glued one side I added duct tape to the external part of the cockpit to hold it in place. You can use painter's tape too. Once it dried, I glued the bottom end of the fuselage together and then finally glued the other side -- this clockwise gluing technique allows me to align each corner as I glue, resulting in a smooth and aligned repair job.
 I then sealed the seems with duct tape -- careful to not use too much as it adds weight. Also, remember that Epoxy is tough and weighs a lot -- so be conservative with it. You need a lot than you think. It will hold up and crashes will likely break anywhere, but along the Epoxy seem.
 Finally I reinforced the two sides and the bottom with packaging tape and used my Xacto blade to clean off excess. I do endorse the use of packaging tape for repair jobs, but with cheaper "throw away airplanes," like this one, I think it is okay.
This plane will fly again. The number of flights will be determined on the ease of landings. If the plane never has a mild to hard crash again it will last a long time. After it is dead, you can gut it and make a SPAD (Google it) RC airplane or you can buy a cheap small free flight styrofoam plane, the ones you had when you were a kid, and build your own plane. I recently bought a few at the Dollar Tree just for that reason. Some day they will be home-made RC airplanes -- maybe used for combat fights. I like to recycle what I can.
Free flight with snow skis
 It was a bit too windy to be successful with a take-off and landing in my backyard today, but the video below will prove to you that this little plane has enough power to get the tail off the ground and take-off from snow with hand-made skis.
What you need to buy is:
1) Harbor Freight Cessna free flight airplane for $6.99 with charger. Goes on sale for that price at least once per month.
2) To make the skis visit my sister site for DETAILED instructions. Also on the site is a video of Dave's LARGER home-made skis with take-off and landing. These videos are also on YouTube.com. The sister site url is:
http://www.rcplanepilot.blogspot.com/
Wednesday, February 14, 2007
Dubro Parkflyer Skis ($10)
 What fun! Today is the first big snow fall we have had all season (powder, then frozen rain, and then more powder. Snow was mildly frozen on the surface. Perfect for RC snow skis). So I installed my Dubro Parkflyer Snow Skis I purchased for $10 from my local hobby store. I taxi'd around my backyard and had a couple super short and low altitude flights. I loved it. The plane is fast on snow.
 The directions supplied from Dubro were helpful, but not perfectly clear. I drilled a few extra holes in my skis that I didn't need, because the directions were confusing. So I cheated and went online and Googled the installation and found a guy who posted pictures of his slow flyer with a pair on. I, too, am posting pictures for you to see so you can avoid the hassle all together.
 Enjoy taking-off from snow and landing on it. I found the snow and skis to be VERY forgiving.
Wednesday, February 07, 2007
How to "loop"
 If you have a 3-channel airplane the first stunt you will learn to do is loops. Before you attempt your first loop make sure that you are 3-mistakes high (75 feet) in case your plane stalls and looses altitude.
 Inverted loops will be more difficult to achieve if your wings are dihedral, since your plane will not trim easily while upside down. My Graupner Mini Piper hated to fly upside down. The best I could do was very shallow dives.
Choosing your second plane
 Selecting your second plane will be a less daunting task than your first. Now that you know how to fly and how you want your next plane to perform you can begin researching. For my third plane, I bought a "Extra Stiffy" by Copperhead Aviation fully loaded with Hitec 56-B servos and the recommended Hacker motor and Phoenix ESC. The reviews for this plane were great. I knew I would reuse my transmitter and a receiver.
 As you can see the build for this plane is not too demanding. I bought my plane a friend are pre-built and flown. I don't recommend doing this unless you truly trust the person.
If you plan to buy a new radio and high performance plane, I highly recommend you purchase a 2.4 ghz 6-channel Spectrum radio. Read the reviews! For my fifth plane I will buy the Spectrum and go nitro powered.
If I was purchase my second plane all over again I would buy a Parkzone Typhoon RTF for $215 (watch for Black Friday sales . . . I have seen for $169 at www.nesail.com). Unfortunately, I can't find a photo of it that I can save and post on this site. The plane requires very little assembly and performs very well. Parts are readily available at your LHS (local hobby store). If you purchased a 2 or 3-channel beginner's plane without a reusable servos and receiver, the Parkzone Typhoon is probably the best bet. Spurge for the lipo battery too.
Visit www.youtube.com for videos of the Parkzone Typhoon.
Air Hogs: 2-Channel Heli
 Though I am impressed with technology and the ability to produce such a tiny 2-channel EPP-durable helicopter for $29, I easily bore of anything that is 2-channel, whether car, plane, or helicopter.
A 2-channel helicopter can go up/down and spin counter/clockwise, but not fly forward. The Air Hogs Havoc has plenty of power and climbs nicely indoors or outdoors.
My recommendation, if you want an inexpensive indoor/micro helipoter is the Air Hogs Helix 6-channel helicopter for $79 at Target or Toys-R-Us. If you want an electric outdoor helicopter, visit www.hobby-lobby.com.
Saturday, January 13, 2007
Aerobatics: 4-Channel Plane
My second plane is a EPP foamie: "The Potensky Eagle". I have replaced the ESC (electric speed control) with a Great Plance C-12 and put a EPS350 motor/gearbox (5.33x1) and a slowflyer large prop on it after a nose dive broke the gear drive. It does not have the power that I want, but does fly slowly and gives me the opportunity to practice my aerobatics. Below is a Youtube.com video of the Eagle. Other videos are also posted, just search for "Quiet Flyer".
My third plane is another foamie -- the Copperhead Extra Stiffy with a brushless motor. This plane will be put me in a whole new league of performance. But first I want to master my Eagle.
My third plane is another foamie -- the Copperhead Extra Stiffy with a brushless motor. This plane will be put me in a whole new league of performance. But first I want to master my Eagle.
Nice Flight: Hobbyzone Scout
Dave has gotten used to his Hobbyzone Scout, which out-performs his Hobbyzone Outlaw he replaced. The Scout is much more sensitive to turns because the V-tail control direction as opposed to two motors (like the Yellow Bee in the earlier post). The Scout is a bit quick, but flies stable and confidently allowing Dave to fly at very low altitudes confidently. The plane has good power and can climb at a decent angle to gain altitude.
How to avoid a crash
There are two key points to remember when flying regarding avoiding crashes:
The first is to fly at three mistakes high -- each mistake is 25 feet high. The idea being that if you loose control doing a stunt you will loose altitude to 50 feet in the air and then take an additional 25 feet to recover control; therefore you gain control 25 feet of the ground, which is a safe altitude. If you are closer to the ground it is likely you will crash.
Dave flew three mistakes high and cut motor while giving full left turn to cause the plane to spiral. His mistake was when it lost control he did NOT let off the controls (which would self correct itself); rather he gave full power to pull out. It did not work
The second is to know that the plane always wants to self-correct itself. This means that the plane WANTS to fly level and straight. Beginner RC airplanes and most full scale personal planes are great at this. What you must do is zero out all your controls -- absolutely no throttle or turning or elevator. The plane correct irself given you have adequate height.
If you are too close to the ground, you will need to decide what's the best approach, i.e. full power and full up elevator (what ever you do give the radio the is opposite of what the plane is doing. So if the plane is headed downward in a left spiral give up/right to counter correct.
Sunday, January 07, 2007
Test Flight #2 -- Hobbyzone Scout
Dave's first test flight was a success, but he flew on too windy of a day and ended up down-wind and could not bring it back; therefore he lost it over a residential neighborhood. He recovered it after it had crashed into a tree and smack against the concrete. His wing was snapped in half. He bought a replacement, not stock, which is slightly larger.
He complained that the plane seemed to lack power. He informed me that he charged his NiMH batteries two weeks ago. Note: NiMH batteries loose power over time and it is best to charge the night before or day of so you have the batteries at full capacity.
Dave hand launched since he could not find his wheels. His plane took off nicely. I suspect with a battery charged at full capacity it would climb a little more quickly.
As suspected the Hobbyzone Scout is a stable flyer. It's best to have a large field and windless day to get use to its behaviors.
It makes a great first airplane if you are unsure if the hobby is one you will be in for the long haul, because at $50 it is something you could walk away from.
Subscribe to:
Posts (Atom)